Iyengar Yoga · Session 2 of 3
Feet, knees and support
Editorial guidance · awaiting teacher review · about 26 minutes
Listen & follow
Spoken guidance for the full session
Hear the opening, every movement, breath cues, adaptations and the closing. Quiet spaces give you time to practise and rest. Pictures advance with the spoken session.
Keep this page open and the screen unlocked. Hiding the page pauses the session. Resume repeats an interrupted sentence. Voice quality and availability depend on your device; some voices need an internet connection. Spoken cues use English names; Sanskrit remains on screen. Timing may extend so a cue is never cut short.
Read the complete spoken transcript
Before you begin
Welcome to Feet, knees and support. This is editorial guidance awaiting teacher review. Have a stable chair, a mat and suitable cushions nearby. Read the full series for supports and adaptations; use only comfortable, familiar transfers. These are original introductory practices inspired by the emphasis described here, not an official class, authorised syllabus or certification in this school. Study the full method with an appropriately trained teacher. Choose only movements and transfers that are comfortable and familiar. Stop for pain, dizziness or feeling unwell. The session will move on automatically, with quiet spaces for practice and rest. Pause whenever you need more time. Timed blocks include setup, short repetitions, side changes and rest; they are not continuous holds. Keep breathing naturally. English movement names will be spoken. Sanskrit names remain on screen.
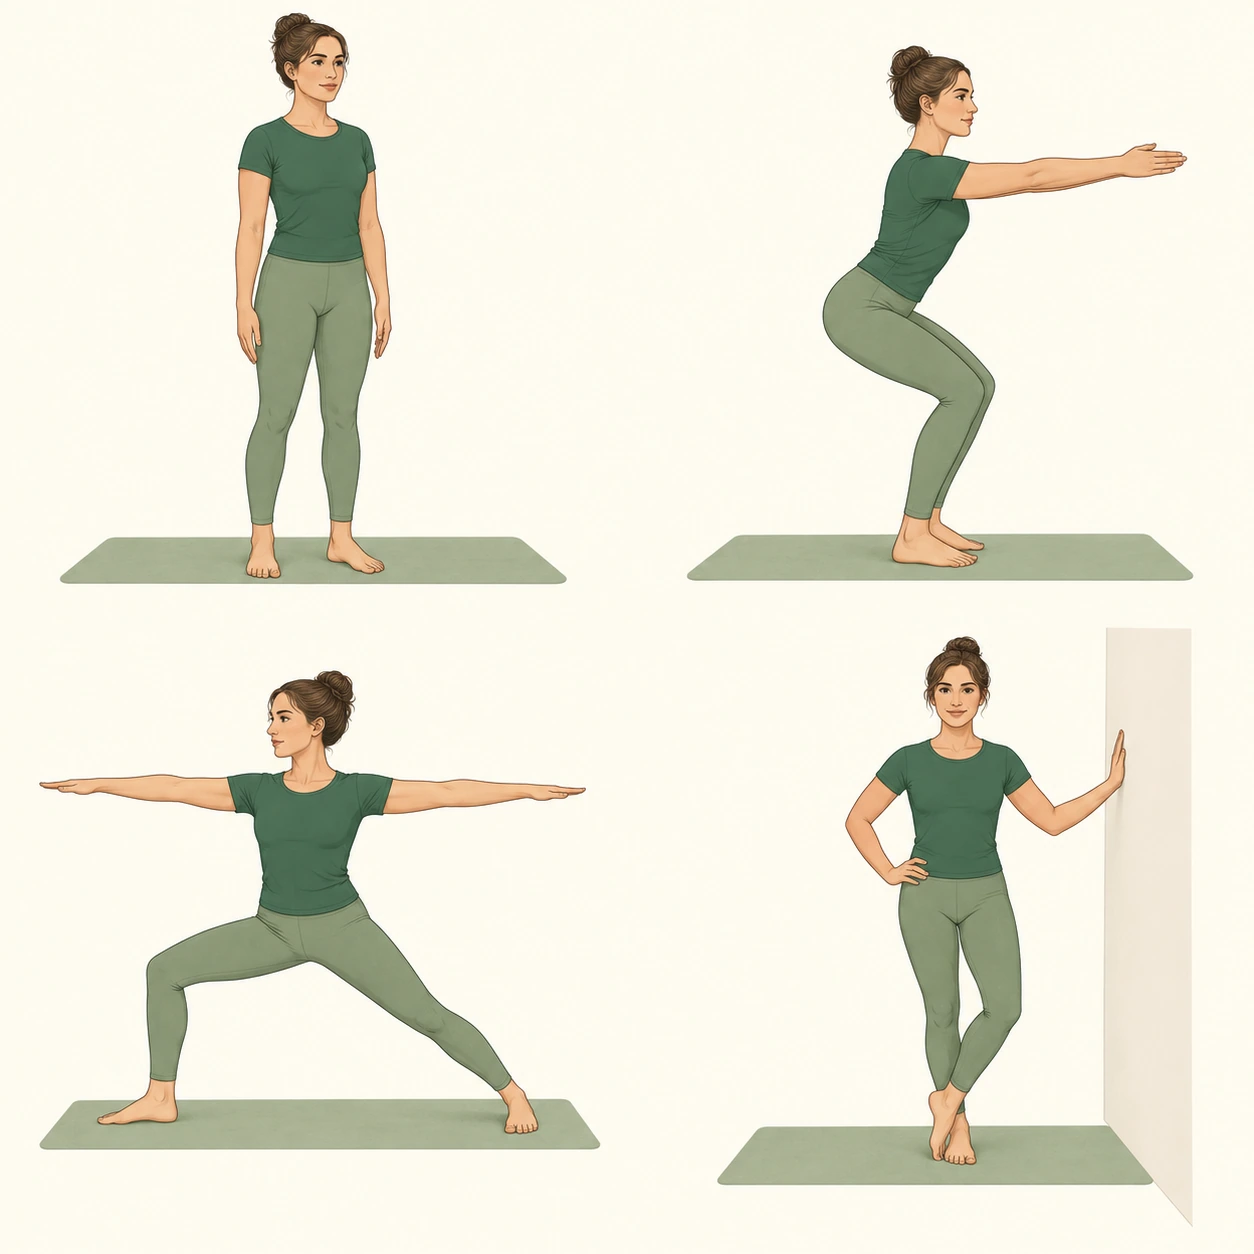
1. Mountain
Movement 1 of 6. Mountain. Arrange your supports and choose a comfortable starting position before beginning. Breath cue. Natural, comfortable breathing. Stand feet comfortably apart, knees unlocked, arms by the sides. Take 3 to 5 breaths; add small weight shifts and return to stillness. Another option. Use a wall or sit upright with feet supported. Use the quiet space for familiar practice or rest. You do not need to keep holding a position until the next cue.
Quiet practice and rest within a 3-minute block. Follow the short stays described, not a continuous hold.
2. Chair
Movement 2 of 6. Chair. Release the previous position. Pause in a comfortable neutral position and arrange any support before continuing. Breath cue. Exhale to bend; inhale to rise. From standing, bend knees a little and move hips back with heels grounded. Reach arms forward if comfortable. Rise after 2 breaths; rest and repeat up to 4 times. Another option. Use a shallow supported sit-to-stand from a stable chair. Use the quiet space for familiar practice or rest. You do not need to keep holding a position until the next cue.
Quiet practice and rest within a 4-minute block. Follow the short stays described, not a continuous hold.
3. Supported standing hip hinge
Movement 3 of 6. Supported standing hip hinge. Release the previous position. Pause in a comfortable neutral position and arrange any support before continuing. Breath cue. Exhale to hinge; inhale to return. Place palms against a stable wall, soften the knees and step back into a small hip hinge. Stay for 2 to 3 breaths, then step in and rise slowly. Repeat after a standing pause. Another option. Use a higher hand position and much less depth. Use the quiet space for familiar practice or rest. You do not need to keep holding a position until the next cue.
Quiet practice and rest within a 4-minute block. Follow the short stays described, not a continuous hold.
4. Warrior II
Movement 4 of 6. Warrior II. Release the previous position. Pause in a comfortable neutral position and arrange any support before continuing. Breath cue. Exhale to bend the front knee; breathe freely. Take a comfortable wide stance. Turn the front foot out, bend its knee in the direction of the toes, keep back leg long and extend arms. Stay 3 breaths, straighten and rest. Change sides before repeating. Another option. Shorten the stance, bend less and keep hands on hips or support. Complete both sides, returning to neutral between them. Keep to the short repetitions or stays described and rest between efforts. Use the quiet space for familiar practice or rest. You do not need to keep holding a position until the next cue.
After about 2:30 in this block, once earlier guidance has finished:
If you have not already changed sides, return to neutral, take a rest and then practise the other side. If you have finished both sides, use this time to rest.
Quiet practice and rest within a 5-minute block. Follow the short stays described, not a continuous hold.
5. Supported tree
Movement 5 of 6. Supported tree. Release the previous position. Pause in a comfortable neutral position and arrange any support before continuing. Breath cue. Keep breathing normally; no holding. Stand by a wall with one hand supported. Keep free toes on the floor and heel near the standing ankle. Pause for 3 breaths, release and change legs. Repeat up to 3 times. Another option. Keep both feet on the floor and practise small weight shifts. Do not press into the knee. Complete both sides, returning to neutral between them. Keep to the short repetitions or stays described and rest between efforts. Use the quiet space for familiar practice or rest. You do not need to keep holding a position until the next cue.
After about 2:00 in this block, once earlier guidance has finished:
If you have not already changed sides, return to neutral, take a rest and then practise the other side. If you have finished both sides, use this time to rest.
Quiet practice and rest within a 4-minute block. Follow the short stays described, not a continuous hold.
6. Final rest
Movement 6 of 6. Final rest. Use stable support and a floor transfer you already know. Pause in a comfortable seat before arranging the next position; use the seated alternative if needed. Breath cue. Let the breath settle naturally. Rest with legs comfortable, arms away from the body and support under knees if wanted. Another option. Rest on your side or in a supported chair. Eyes may stay open. Use the quiet space for familiar practice or rest. You do not need to keep holding a position until the next cue.
After about 5:00 in this block, once earlier guidance has finished:
Take your time to finish this rest. When ready, move fingers and toes, roll to a side, pause, then use hands to sit up slowly.
Quiet practice and rest within a 6-minute block. Follow the short stays described, not a continuous hold.
Closing the session
This session is complete. Remain comfortably supported for a moment and let your breathing settle. There is no need to stand up quickly. Notice the room around you. You can record your practice in My Ananda, or simply finish here. Return to a familiar session whenever it suits you.
Movement 1 of 63 min suggested block
Your movement
Mountain
Tāḍāsana
Mountain posture
To begin: Arrange your supports and choose a comfortable starting position before beginning.
Stand feet comfortably apart, knees unlocked, arms by the sides. Take 3–5 breaths; add small weight shifts and return to stillness.
Another option: Use a wall or sit upright with feet supported.
Follow at your own pace, with as many extra breaths and pauses as you need. You choose when to move on.
Next: Chair
Equipment, scope & review status
Have a stable chair, a mat and suitable cushions nearby. Read the full series for supports and adaptations; use only comfortable, familiar transfers.
These are original introductory practices inspired by the emphasis described here, not an official class, authorised syllabus or certification in this school. Study the full method with an appropriately trained teacher.
Stop for pain, dizziness or feeling unwell. This general practice is not an individual clinical plan.
Read the review status and context. The timer pauses when the page is hidden. Moving to another stage resets it; start it again when ready.